This article will help you learn SAPUI5 step-by-step. Jump start SAPUI5 programming and create your first SAPUI5 application using SAP Web IDE.
In this application, we create a button and display a toast message on the press of button based on latest SAPUI5 coding standards.
Don’t worry if you don not know anything in SAPUI5. This article in intended for newbies in SAPUI5.
The preferred development IDE for building SAPUI5 applications is SAP Web IDE. Don’t know what’s WebIDE. May be you have missed my previous article in this series SAPUI5 self-training tutorials. If you do not have a Web IDE account refer http://www.amarmn.com/sapui5-development-environment-setup/ to create one and lay your foundation to learn SAPUI5.
Log into SAP Web IDE.
In Web IDE switch to development perspective by clicking on the icon “</>”. You will find a Workspace folder. We will create our first SAPUI5 example MyFirstApp inside the Wordspace folder.
This is hands-on SAPUI5 self-training tutorial, hence we will build the application from scratch.
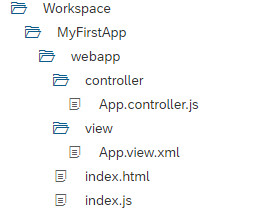
Right-click Workspace and select New > Folder to create new project folder named MyFirstApp. Under MyFirstApp folder create folder webapp. Repeat the process to create all folders and files as displayed in the image below.
SAPUI5 MVC paradigm
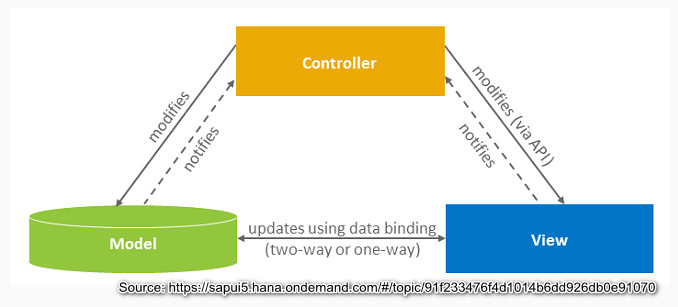
SAPUI5 follows the Model View Controller paradigm. I have explained in detail about MVC in my article http://www.amarmn.com/mvc-architecture-in-sapui5-application/ .
In the above folder structure, we created separate files for the controller and the view, thereby separating the UI code from the logic code. Following MVC gives an application with better readability, maintainability and extensibility.
SAPUI5 index.html
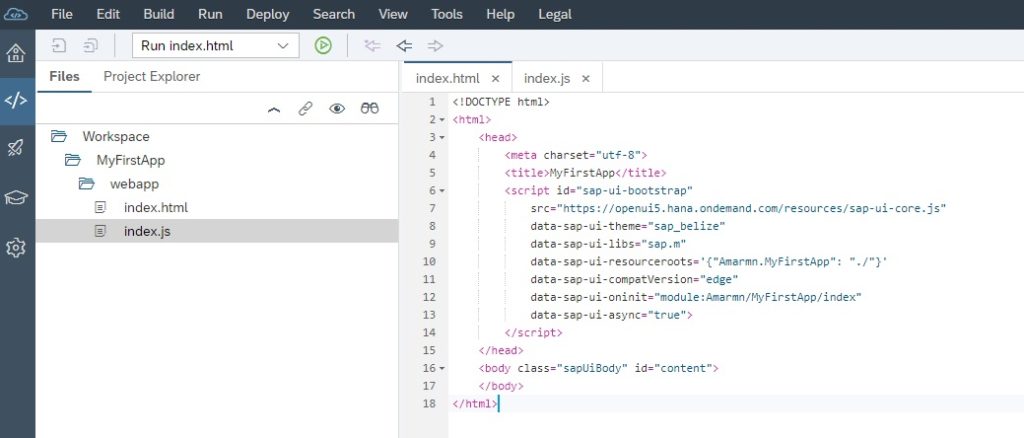
index.html file in SAPUI5 applications can be considered as the starting point of SAPUI5 applications. An SAPUI5 application with index.html file can be run as a stand-alone application. Yes, for the time being keep in my mind that it is possible to have SAPUI5 applications without an index.html file and those applications are run inside SAP Fiori Launchpad. If you want to run your application independently as stand-alone application, you should have an index.html file which will be the starting point of your application.
What does SAPUI5 index.html holds?
index.html file holds the SAPUI5 bootstrap. The SAPUI5 bootstrap script has id=”sap-ui-bootstrap” and it tells browser about important resources that needs to be loaded for the SAPUI5 application to run. It also initializes the SAPUI5 runtime as soon as the script is loaded and executed by the browser.
So, in the case of SAPUI5 apps without an index.html, how bootstrapping takes place. It is taken care by the SAP Fiori Launchpad.
<!DOCTYPE html>
<html>
<head>
<meta charset="utf-8">
<title>MyFirstApp</title>
<script id="sap-ui-bootstrap"
	src="https://sapui5.hana.ondemand.com/resources/sap-ui-core.js"
	data-sap-ui-theme="sap_belize"
	data-sap-ui-libs="sap.m"
	data-sap-ui-resourceroots='{"Amarmn.MyFirstApp": "./"}'
	data-sap-ui-compatVersion="edge"
	data-sap-ui-oninit="module:Amarmn/MyFirstApp/index"
	data-sap-ui-async="true">
</script>
</head>
<body class="sapUiBody" id="content">
</body>
</html>
Let’s understand the code of index.html file. I assume that you have basic knowledge of html.
The <script> tag with id=”sap-ui-bootstrap” is responsible for loading and initializing SAPUI5 core.
The src attribute provides path to load SAPUI5 core library. Here we have used content delivery network CDN ‘https://sapui5.hana.ondemand.com/resources/sap-ui-core.js’. The Core facilitates loading of other libraries also specified in the data-sap-ui-libs attribute.
data-sap-ui-theme mentions the theme used in the application.
data-sap-ui-compatVersion=”edge” ensures to use latest functionality of SAPUI5
data-sap-ui-async=”true” is asynchronous loading of SAPUI5 resources for performance.
data-sap-ui-oninit=”module:Amarmn/MyFirstApp/index” defines a module that will be loaded initially. This attribute enhances app security as it helps avoid directly executable JavaScript code in index.html file.
data-sap-ui-resourceroots='{“Amarmn.MyFirstApp”: “./”}’ tells SAPUI5 core that the resources in the namespace are in the same folder as index.html file.
sapu5 index.js file
The index.js file will be called only when the resource loading is successful. The init event triggers when the bootstrapping is successful, and the index.js file is called in the callback function for the init event.
Paste the below piece of code inside index.js file. In the index.js file, we instantiate the XML view.
sap.ui.define([
	"sap/ui/core/mvc/XMLView"
], function (XMLView) {
	"use strict";

	XMLView.create({
		viewName: "Amarmn.MyFirstApp.view.App"
	}).then(function (oView) {
		oView.placeAt("content");
	});
});
Later in my serious of sapui5 tutorial and sapui5 training articles you will find that I will replace this index.js file with Component file. For the time being, just be familiar with the use of index.js file as the same principle follows for Component file.
Asynchronous Module Definition
Did you notice the sap.ui.define at the beginning of index.js file? sap.ui.define is for Asynchronous module definition AMD and facilitates asynchronous loading of defined libraries. The code inside function will only execute when all dependencies are loaded.
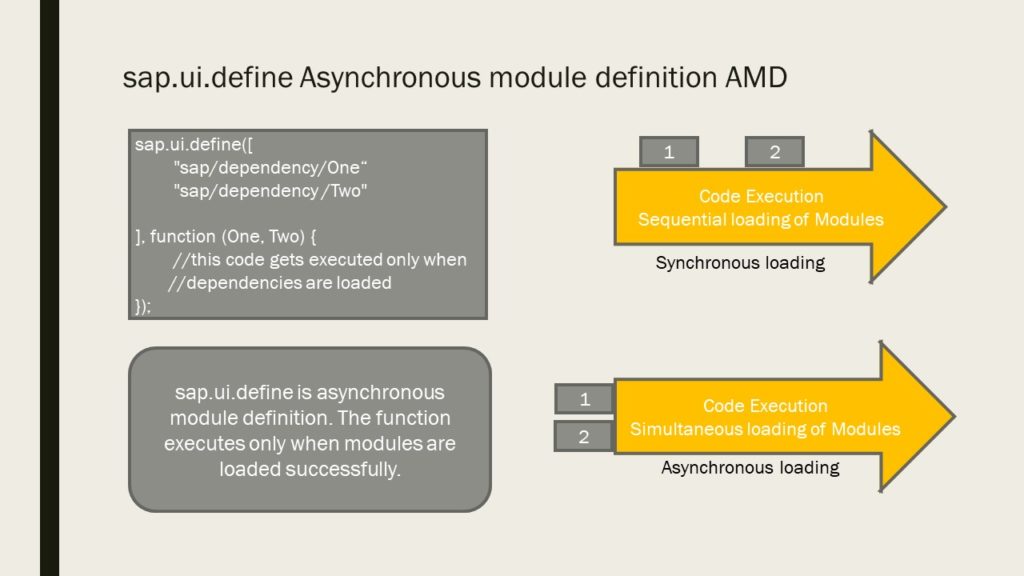
sap.ui.define holds the array of required modules with their fully qualified path. This Asynchronous Module Definition helps in asynchronous loading of required modules and also separates the module loading from code execution.
The resource objects are passed as parameters to the call back function.
sapui5 xml view
View in SAPUI5 application holds the UI code. It is responsible for defining and rendering the UI of SAPUI5 application. We have used XML view, but there are other view types supported by SAPUI5 application that I will explain at the end of this article.
In index.js we instantiated the SAPUI5 XML view file.
The view.xml file holds UI of SAPUI5 application. Paste the below code in App.view.xml file.
<mvc:View controllerName="Amarmn.MyFirstApp.controller.App"
	xmlns="sap.m"
	xmlns:mvc="sap.ui.core.mvc">
	<Button
		text="Press the button"
		press=".onPress"/>
</mvc:View>
controllerName=”Amarmn.MyFirstApp.controller.App” is reference to the controller.
xmlns=”sap.m” is the default namespace where most of controls that we will use in our view resides.
xmlns:mvc=”sap.ui.core.mvc” namespace is defined with alias mvc and refers to the core mvc.
Make sure that you define the namespace before using it in XML view.
SAPUI5 has a rich set of controls and in this example we have used the Button control and defined one property text and one event Press. Have a look at the sapui5 sdk for Button control. The API Reference library gives all the details required to understand and use a SAPUI5 control. Notice the properties, events, associations and aggregations as these are the few things for which you will have to refer the sapui5 sdk frequently.
For the button control we have used the property text and the event press. The .onPress event handler function will be called when the button is pressed. As you can see in the code, we have attached this function to the press event of the button.
Where do we write the logic of this event handler function. The code of this event handler function is written in the Controller file. Remember, as per our MVC pattern, we have vowed to keep separate the UI and the logic code.
The view has its own controller file, and we write the event handler function and its logic inside the controller file.
Code in App.Controller.js file
sap.ui.define([
	"sap/ui/core/mvc/Controller",
	"sap/m/MessageToast"
], function (Controller, MessageToast) {
	"use strict";
	return Controller.extend("Amarmn.MyFirstApp.controller.App", {
 onPress : function () {
 MessageToast.show("My First SAPUI5 application");
		}
	});
});
As you can find from the above code, we have written onPress function here. It displays a toast message.
Controller file has the Asynchronous Module definition to load the modules which is then used in the controller.
Test the App to see the result
Click the Run button on the toolbar.

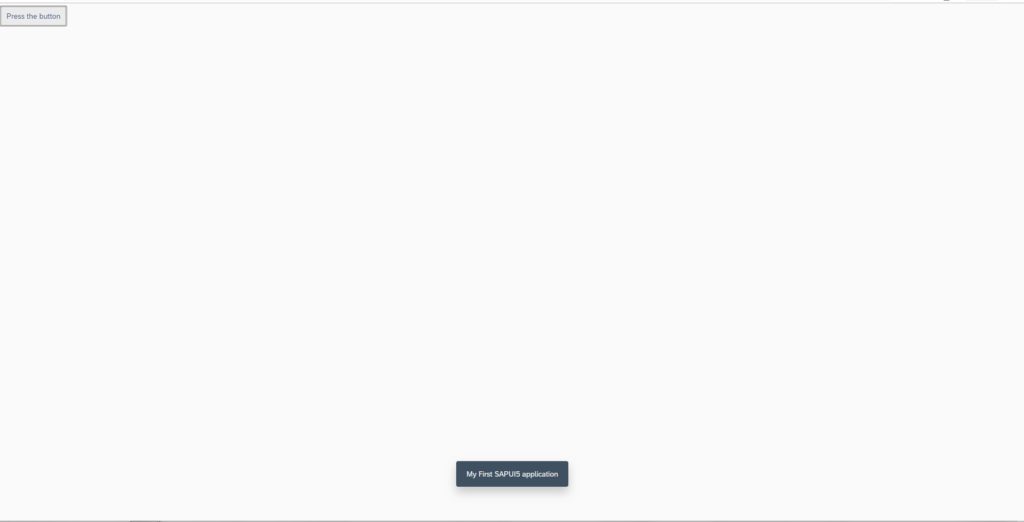
Before I conclude this article, just for information know the various types of views that SAPUI5 supports.
sapui5 view types
SAPUI5 support four View Types. XML, JS, HTML and JSON. It is recommended to use XML views. XML view ensures that you strictly follow MVC architecture and gives a better readable code.
Its very easy to sprinkle logic in a JS code, which leads to poor coding standards on the long run.
Also, all SAPUI5 references provided by SAP are in XML coding, so its better we also follow the same.
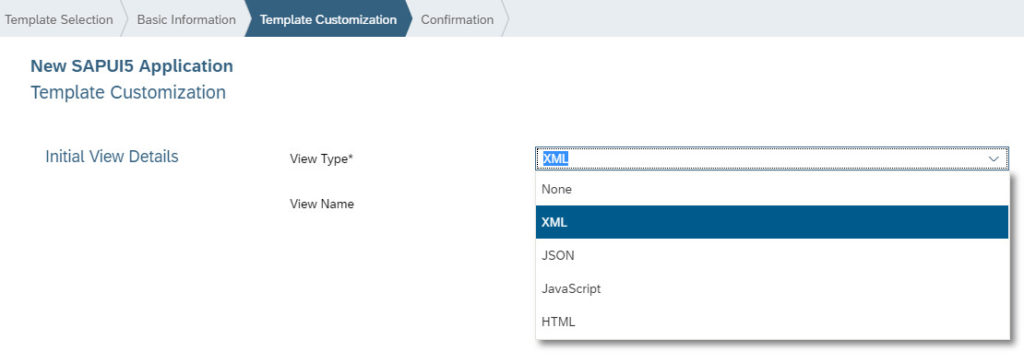
If you have worked till here, then this is a remarkable achievement. Above steps are as per latest SAPUI5 coding standards using SAP Web IDE.
Conclusion:
This article helped in building our first SAPUI5 application. We understood a lot of concepts like
- sapui5 mvc approach and sapui5 mvc architecture
- first sapui5 tutorial for beginners
- importance of sapui5 index.html file
- bootstrapping in sapui5
- asynchronous module definition in sapui5
- sapui5 view and its controller file
- controls in sapui5
- various view types in sapui5
SAPUI5 Tutorials
- SAPUI5 Development Environment Setup
- MVC architecture in SAPUI5 application
- SAPUI5 Programming for Beginners- Part 1- Start coding in SAPUI5
- SAPUI5 Programming for Beginners – Part 2 – Introducing SAPUI5 JSON Model
- SAPUI5 Component.js file and SAPUI5 Manifest file – Part 3 – SAPUI5 Programming for Beginners
- Embedding custom CSS style class to SAPUI5 control – Part 4- SAPUI5 Programming for Beginners
- SAPUI5 ComboBox XML Example: Bind Items, Get Selected Item
- SAPUI5 Fragments Example – Part 5 – sapui5 tutorial for beginners
- SAPUI5 sap.m.list example Aggregation Binding – Part 6 – sapui5 tutorial for beginners
- SAPUI5 Expression Binding How to Use – Part 7 – sapui5 tutorial for beginners
- SAPUI5 Custom Formatter Functions How to Use – Part 8 – sapui5 tutorial for beginners
- SAPUI5 Routing and Navigation with Parameter – Part 9 – sapui5 tutorial for beginners
- SAPUI5 OData model: How to consume Northwind OData service in SAPUI5 Application
- SAPUI5 table with edit Button and editing row value in popup Dialog box
- Connecting SAP HANA Cloud Platform with the Cloud Connector
- SAPUI5 SplitApp example in the easiest way
- SAPUI5 OData: How to implement Filter, Sort, Expand and Group
- SAPUI5 OData CRUD Operations
- SAP tools for Eclipse
- Raise Odata error message handle in SAPUI5
- SAPUI5
- SAPUI5 Nested View
- SAPUI5 define modules
- SAPUI5 Element Binding master detail table example
- SAPUI5 display Message Toast

