Example on OData service with the four basic functionalities of Create, Read, Update and Delete and its consumption in a SAPUI5 application is known as SAPUI5 Odata CRUD Operations.
Create an OData service with CRUD operations and consume it in a SAPUI5 application. This simple exercise on OData and SAPUI5 application covers CRUD operations as well as explains how to deploy the final SAPUI5 application on SAP Fiori Launchpad.
Creating OData service and implementing CRUD methods
Begin by creating an OData service and redefining the CRUD methods. An OData service is created in the Backend system and it is registered in the Frontend system in a Central Hub Deployment landscape. But do check your organizations’s landscape before start building with OData service as different company may follow a different landscape.
Open SAP Netweaver Gateway service builder using TCode SEGW. Choose Create Project, to create a new OData service project.

Fill in the entries as shown below and click Continue.

Next we need to create Entity Type and EntitySet. We will use ABAP structure SCARR to create EntityType. Right click Data Model and select Import-> DDIC Structure.
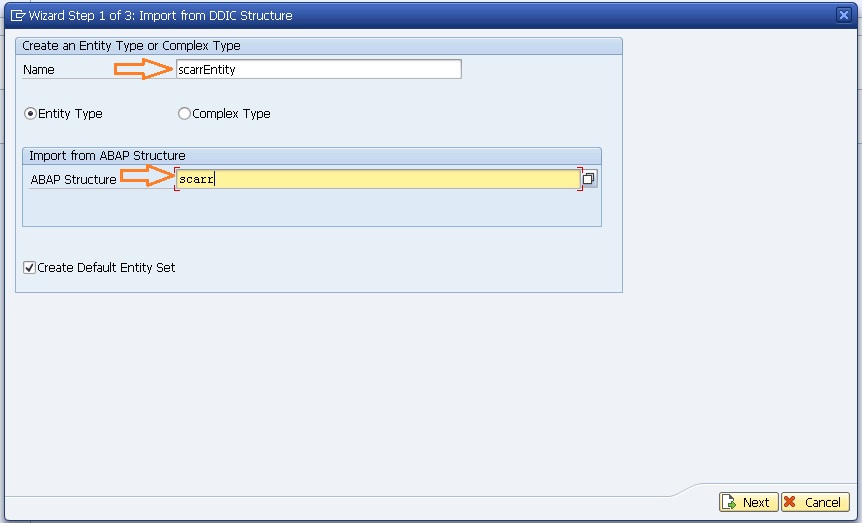
In the Wizard, enter Name and ABAP Structure as shown below. Select Check box Create Default Entity Set and click Next.
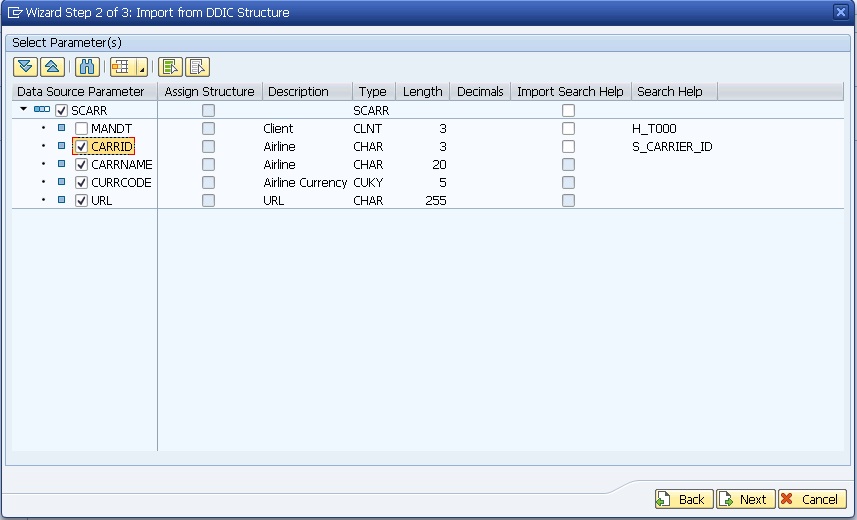
Select the required fields for the Entity. Once done, click Next.
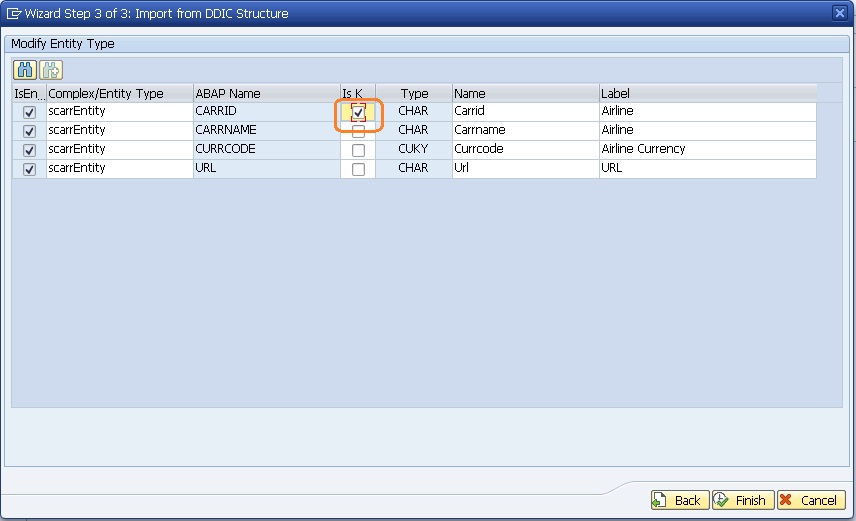
Here we need to select a Key. Its important that Entity must have at least one key. Click Next.
We have now created an OData project.
Next, click on generate button to create the MPC, DPC and the service name. Click on Continue to finish the process.

The above step will create the Runtime Artifacts. The project structure will be as shown below.
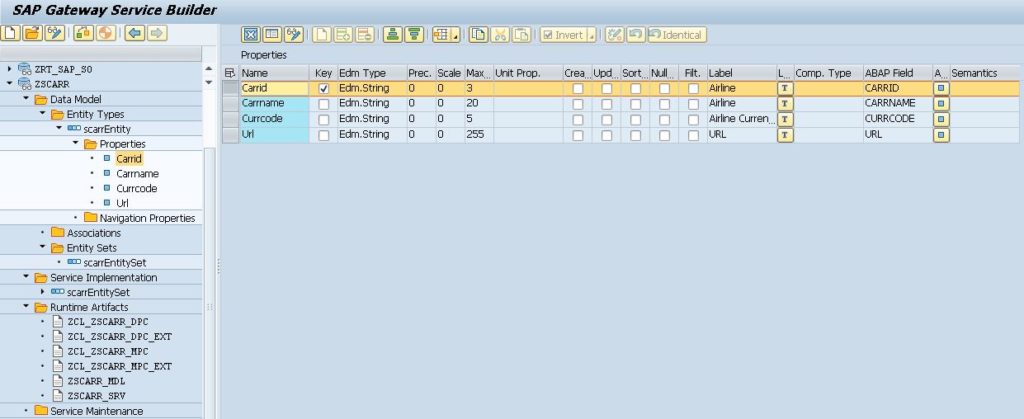
Right click on DPC_EXT class and select ABAP Workbench.

Under inherited methods we have CRUD operations methods. Right click Get_entityset method to redefine.
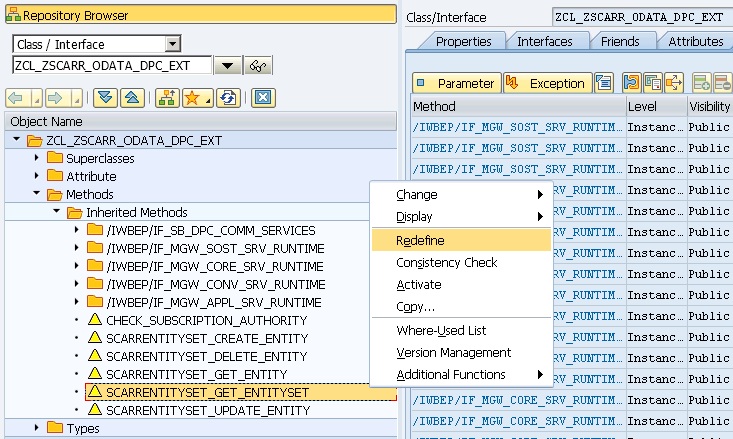
Inside Entity_set method we write code to fetch multiple records.

SELECT * FROM scarr INTO TABLE et_entityset.
Similarly, redefine Get_Entity, Create_entity, Update_Entity, Delete_entity and write code inside the methods.
Code Get_entity

* Fetch Single record based on the key in the URI
    DATA : wa_key_tab LIKE LINE OF it_key_tab.

* Read the Key from URI
    READ TABLE it_key_tab INTO wa_key_tab WITH KEY name = 'Carrid'.
    IF sy-subrc EQ 0.
      SELECT SINGLE * FROM scarr
        INTO CORRESPONDING FIELDS OF er_entity
        WHERE carrid EQ wa_key_tab-value.
    ENDIF.
Code Create_entity
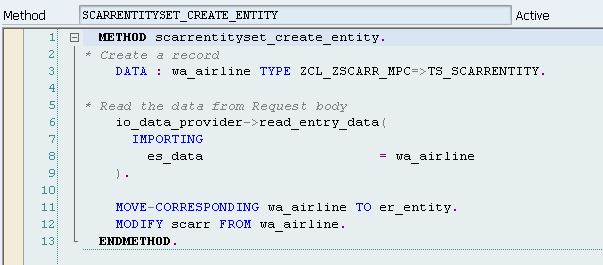
* Create a record
    DATA : wa_airline TYPE zcl_zscb_crud_operatio_mpc=>ts_airline.

* Read the data from Request body
    io_data_provider->read_entry_data(
      IMPORTING
        es_data                      = wa_airline
    ).

    MOVE-CORRESPONDING wa_airline TO er_entity.
    MODIFY scarr FROM wa_airline.
Code Update_entity
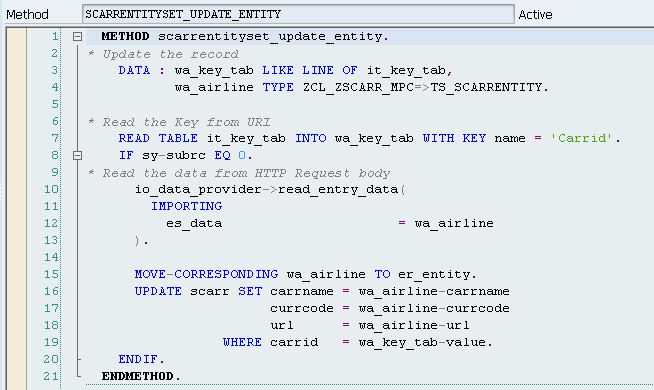
* Update the record
    DATA : wa_key_tab LIKE LINE OF it_key_tab,
           wa_airline TYPE         zcl_zscb_crud_operatio_mpc=>ts_airline.

* Read the Key from URI
    READ TABLE it_key_tab INTO wa_key_tab WITH KEY name = 'Carrid'.
    IF sy-subrc EQ 0.
* Read the data from HTTP Request body
      io_data_provider->read_entry_data(
        IMPORTING
          es_data                      = wa_airline
      ).

      MOVE-CORRESPONDING wa_airline TO er_entity.
      UPDATE scarr SET carrname = wa_airline-carrname
                       currcode = wa_airline-currcode
                       url      = wa_airline-url
                 WHERE carrid   = wa_key_tab-value.
    ENDIF.
Code Delete_entity
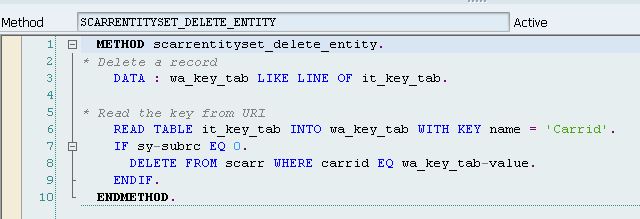
* Delete a record
    DATA : wa_key_tab LIKE LINE OF it_key_tab.

* Read the key from URI
    READ TABLE it_key_tab INTO wa_key_tab WITH KEY name = 'Carrid'.
    IF sy-subrc EQ 0.
      DELETE FROM scarr WHERE carrid EQ wa_key_tab-value.
    ENDIF.
Once done, Save Check and Activate the class. Code reference
Register the service in Frontend gateway system.
Execute TCdoe /IWFND/MAINT_SERVICE. Click on Add Service button.

Once you complete the Add Service step. you should see the OData service under Service Catalog list.

You can test the service by click on SAP Gateway Client button.
This completes the process of creating and registering Odata service with CRUD methods.
Create SAPUI5 Application to consume OData service with CRUD operations
Create a SAPUI5 Application in WebIDE using Project from Template wizard. I have created a project with view as View1.

Right click on the project to attach Odata service created above.

In the wizard, we need to select Select Catalog, select the Gateway system, search and select the odata service, click Next. Go for default model and finish the wizard.
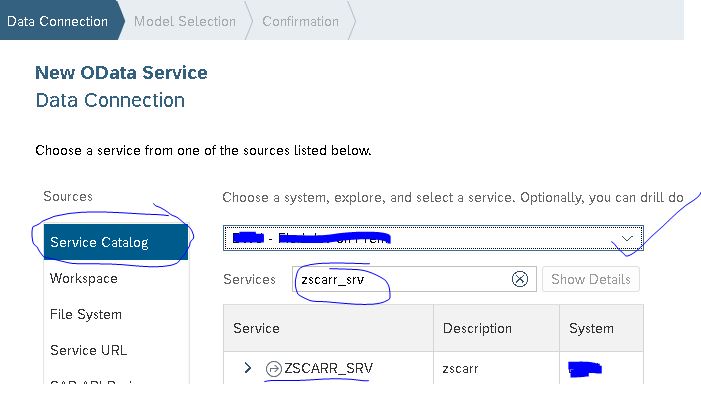
In the Manifest.json file, you can check if the Odata service has been configured correctly.
"": {
	"type": "sap.ui.model.odata.v2.ODataModel",
	"settings": {
	"defaultOperationMode": "Server",
	"defaultBindingMode": "OneWay",
		"defaultCountMode": "Request"
	},
	"dataSource": "ZSCARR_SRV",
	"preload": true
}
Code the View1.view.xml file
<mvc:View
controllerName="Amarmn.zcrud.controller.View1"
xmlns:mvc="sap.ui.core.mvc" displayBlock="true"
xmlns="sap.m">
<Shell id="shell">
<App id="app">
<pages>
<Page id="page" title="Airline">
<content>
<Panel id="__panel1">
<content>
<List id="List"
items="{jsonmodel>/scarrEntitySet}"
headerText="Employees"
mode="SingleSelectMaster"
selectionChange="onPress">
<StandardListItem id="Sli"
title="{jsonmodel>Carrid}"
description="{jsonmodel>Carrname}"
info="{jsonmodel>Currcode}"/>
</List>
</content>
</Panel>
<Panel id="__panel0" headerText="{i18n>addressdetails}">
<content>
<Label text="AirlineID" width="100%" id="__label0"/>
<Input width="100%" id="__input0"/>
<Label text="Airline Name" width="100%" id="__label1"/>
<Input width="100%" id="__input1"/>
<Label text="Currency" width="100%" id="__label2"/>
<Input width="100%" id="__input2"/>
<Button text="{i18n>create}" width="100px" id="__button1" press="onSave"/>
<Button text="{i18n>update}" width="100px" id="__button2" press="onUpdate"/>
<Button text="{i18n>delete}" width="100px" id="__button0" press="onDelete"/>
</content>
</Panel>
</content>
</Page>
</pages>
</App>
</Shell>
</mvc:View>
Code the Controller.js file
sap.ui.define([
	"sap/ui/core/mvc/Controller",
	"sap/ui/model/json/JSONModel",
	"sap/m/MessageToast",
	"sap/ui/model/Filter"
], function (Controller, JSONModel, MessageToast, Filter) {
	"use strict";

return Controller.extend("Amarmn.zcrud.controller.View1", {
onInit: function () {
var oJSONModel = new JSONModel();
this.getView().setModel(oJSONModel, "jsonmodel");
var sUrl = "/sap/opu/odata/sap/ZSCARR_SRV/";
var oModel = new sap.ui.model.odata.ODataModel(sUrl, true);
oModel.read("/scarrEntitySet", {
success: function (data) {
oJSONModel.setData({
scarrEntitySet: data.results
});
}
});
},
onPress: function (oEvent) {
this.getselval1 = oEvent.getSource().getSelectedItem().
getBindingContext("jsonmodel").getObject().Carrid;
this.getView().byId("__input0").setValue(this.getselval1);
this.getselval2 = oEvent.getSource().getSelectedItem().
getBindingContext("jsonmodel").getObject().Carrname;
this.getView().byId("__input1").setValue(this.getselval2);
this.getselval = oEvent.getSource().getSelectedItem().
getBindingContext("jsonmodel").getObject().Currcode;
this.getView().byId("__input2").setValue(this.getselval);
},

onSave: function () {
var oCust1 = this.getView().byId("__input0").getValue();
var oCust2 = this.getView().byId("__input1").getValue();
var oCust3 = this.getView().byId("__input2").getValue();
var postData = {};
postData.Carrid = oCust1;
postData.Carrname = oCust2;
postData.Currcode = oCust3;
this.getOwnerComponent().getModel().
create("/scarrEntitySet", postData, null, function (response) {
MessageToast.show("Address Created Successfully with number  " + oCust1);
var mylocation = location; mylocation.reload();
}, function (Error) {
MessageToast.show("Customer Creation Failed  " + oCust1);
});
},

onDelete: function () {
var oCust1 = this.getView().byId("__input0").getValue();
this.getOwnerComponent().getModel().
remove("/scarrEntitySet('" + oCust1 + "')", {
method: "DELETE",
success: function (data) {
MessageToast.show("Customer deleted Successfully with number  " + oCust1);
},
error: function (e) {
MessageToast.show("Customer deletion Failed  " + oCust1);
}
});
},
onUpdate: function () {
var oCust1 = this.getView().byId("__input0").getValue();
var oCust2 = this.getView().byId("__input1").getValue();
var oCust3 = this.getView().byId("__input2").getValue();
var postData = {};
postData.Adrnr = oCust1;
postData.Name2 = oCust2;
postData.City = oCust3;
this.getOwnerComponent().getModel().
update("/scarrEntitySet('" + oCust1 + "')",
postData, null, function (response) {
MessageToast.show("Customer update Successfully with number  " + oCust1);
var mylocation = location; mylocation.reload();
}, function (Error) {
MessageToast.show("Customer update Failed  " + oCust1);
});
}
});
});
Code reference https://blogs.sap.com/2019/05/25/perform-crud-operations-on-employee-info-in-sap-web-ide-using-sap-ui5/
Deploy SAPUI5 application on SAP Fiori Launchpad
Deploy SAPUI5 Application to the Gateway server from SAP WebIDE
The above code completes the SAPUI5 application. Next, we will deploy the SAPUI5 application to ABAP Gateway system.

Deploy as a new application as it is first time we are deploying the application on ABAP Gateway system.
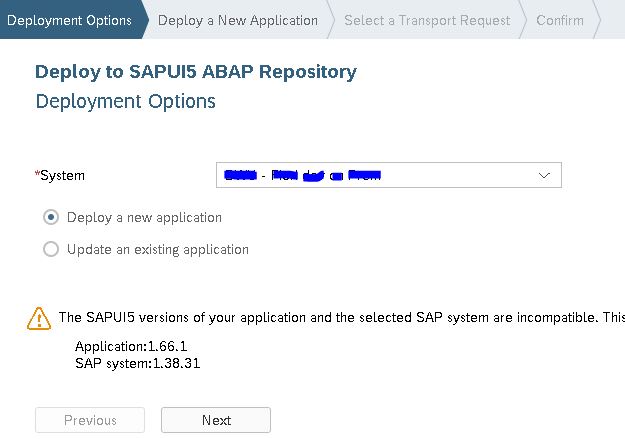
Finish deploying the application to the ABAP Gateway System.
Create Launchpad Role in LPD_CUST
Go to tcode LPD_CUST to create a LPD object. Click New Launchpad button.

In the input fields, provide Role, Instance and Description.
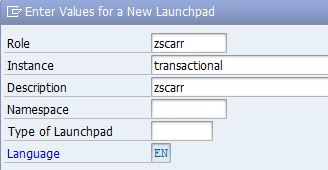
In the Namespace required popup, select Yes. Next, select New Application.

Fill in the required fields as shown in the below image and save.
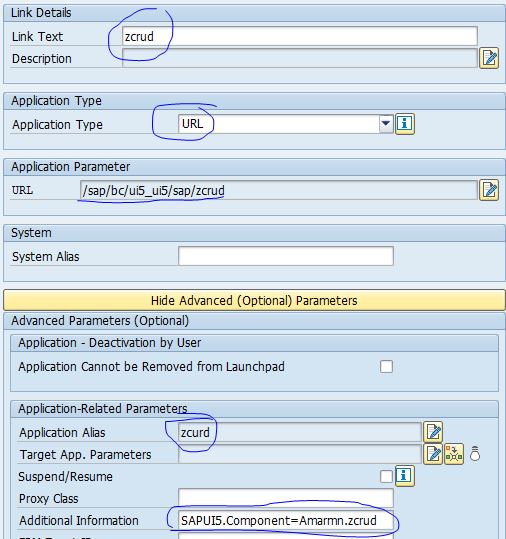
We now have the launchpad instance ready.
Create custom Semantic object
Create a semantic object using tcode /UI2/SEM_OBJ.

Launchpad designer configuration
We next need to complete Launchpad Designer configuration to bring the SAPUI5 application on the SAP Fiori Launcpad.
Go to Launchpad Designer and create a Catalog. The launchpad designer URL should be http://<hostname>:<port>/sap/bc/ui5_ui5/sap/arsrvc_upb_admn/main.html replacing <hostname> and <port> with <hostname> and <port> configured in system.
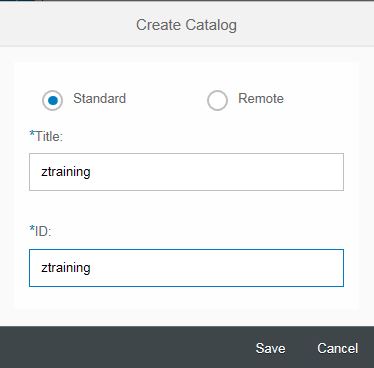
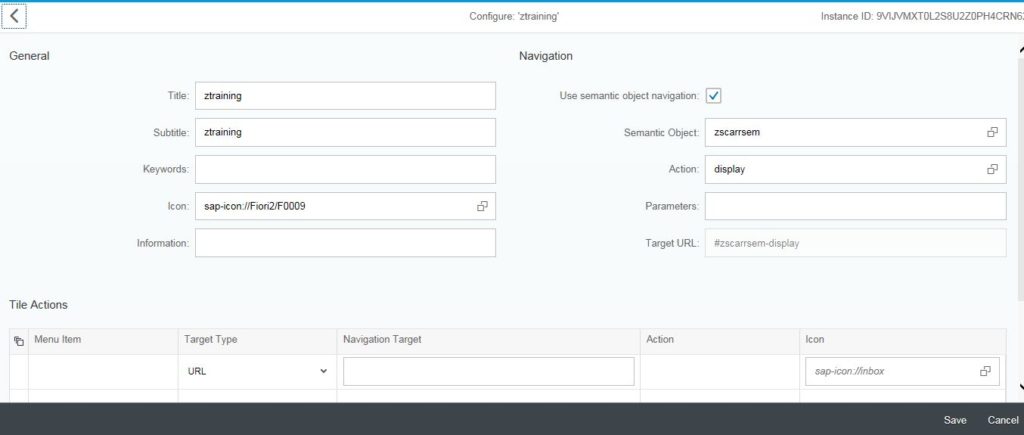
Select the Catalog created and select tile to create a new static tile. Fill in the details as shown in below image to create a tile.
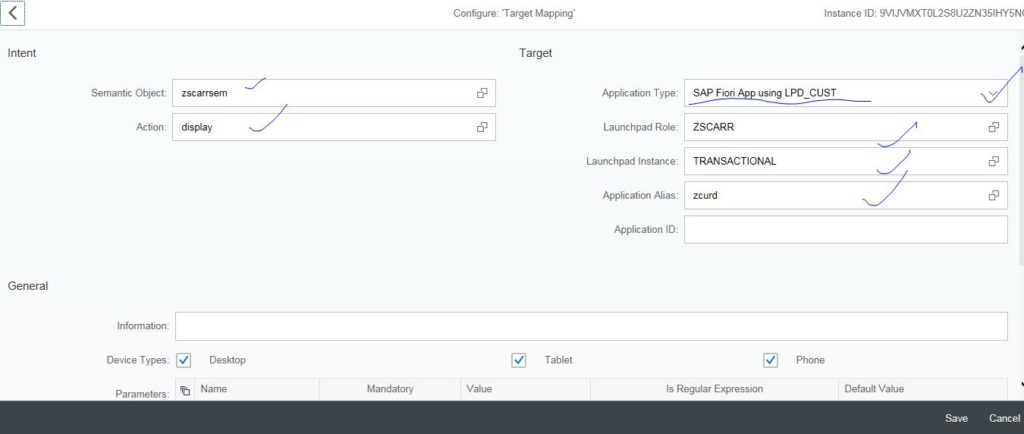
Now we will create target mapping. Fill in the details.
Create custom Role using PFCG tcode
The last thing that would be required is to create role via tcode PFCG in Frontend Gateway system. Enter Role name and click Single Role button. Also add description and save.

In the Menu tab, select small drop down on the Transaction button and select Fiori Tile Catalog. Provide the Catalog ID. The Catalog will be added.
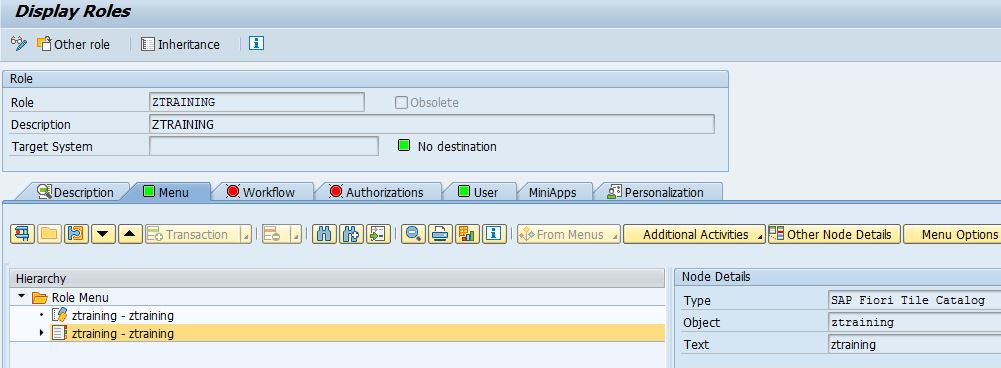
In the User tab, add the User ID who should get access to this role.
Add Catalog from the Fiori Launchpad
At the Launchpad click on the Edit button.
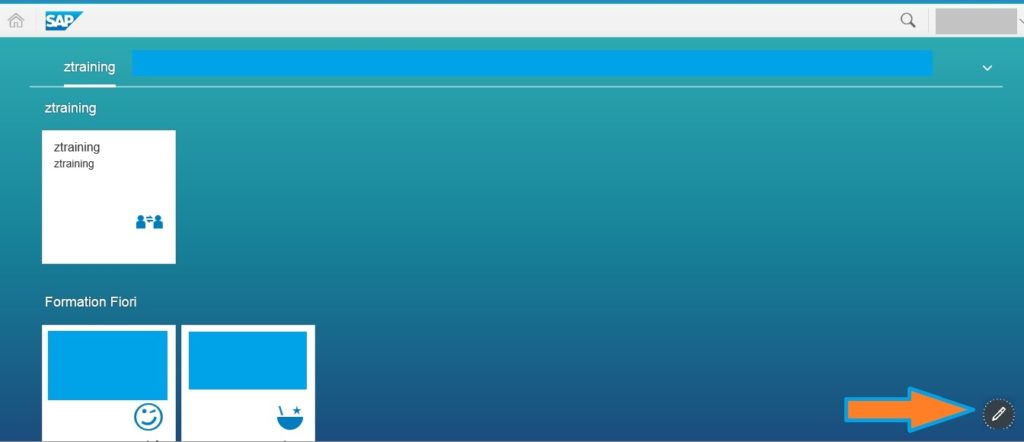
From the catalogs drop down, select the Catalog created by us.
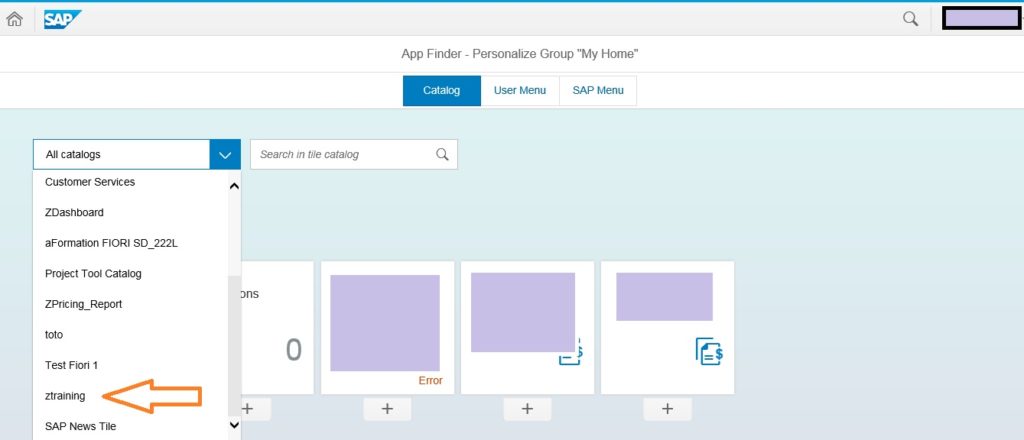
We get the Tile created under this catalog. Click the + under tile to add the catalog in the group.

The tile will now appear on the Launchpad. Click on edit button exit from edit mode.

Click on tile to see the output of the application.
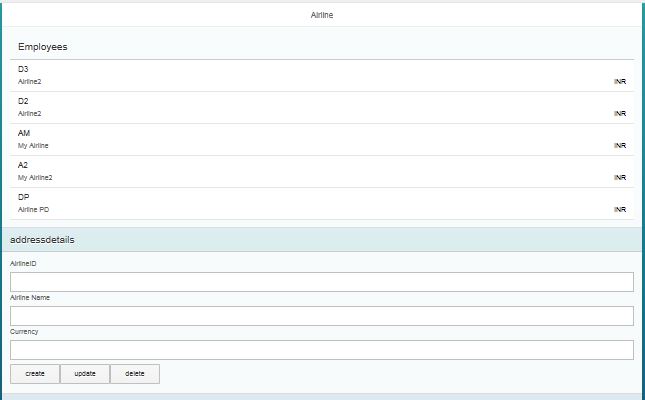
Updated SAPUI5 code with no errors
sap.ui.define([
	"sap/ui/core/mvc/Controller",
	"sap/ui/model/json/JSONModel",
	"sap/m/MessageToast",
	"sap/ui/model/Filter"
], function(Controller, JSONModel, MessageToast, Filter) {
	"use strict";
	var that = this;

return Controller.extend("amarmnzcrud.controller.View1", {
	onInit: function() {
	that = this;
	var oJSONModel = new JSONModel();
	that.getView().setModel(oJSONModel, "jsonmodel");
	var sUrl = "/sap/opu/odata/sap/ZSCARR_SRV/";
	var oModel = new sap.ui.model.odata.ODataModel(sUrl, true);
	that.getView().setModel(oModel);
	oModel.read("/scarrSet", {
		success: function(data) {
			oJSONModel.setData({
				scarrEntitySet: data.results
			});
		}
	});
},
onPress: function(oEvent) {
	that.getselval1 = oEvent.getSource().getSelectedItem().
	getBindingContext("jsonmodel").getObject().Carrid;
	that.getView().byId("input0").setValue(that.getselval1);
	that.getselval2 = oEvent.getSource().getSelectedItem().
	getBindingContext("jsonmodel").getObject().Carrname;
	that.getView().byId("input1").setValue(that.getselval2);
	that.getselval = oEvent.getSource().getSelectedItem().
	getBindingContext("jsonmodel").getObject().Currcode;
	that.getView().byId("input2").setValue(that.getselval);
},

onSave: function() {
	var oCust1 = that.getView().byId("input0").getValue();
	var oCust2 = that.getView().byId("input1").getValue();
	var oCust3 = that.getView().byId("input2").getValue();
	var postData = {};
	postData.Carrid = oCust1;
	postData.Carrname = oCust2;
	postData.Currcode = oCust3;
	that.getView().getModel().
	create("/scarrSet", postData, null, function(response) {
	MessageToast.show("Airline created successfully..  " + oCust1);
	}, function(Error) {
	MessageToast.show("Airline Creation Failed  " + oCust1);
	});
},

onDelete: function() {
	var oCust1 = that.getView().byId("input0").getValue();
	//that.getOwnerComponent().getModel().
	that.getView().getModel().
	remove("/scarrSet('" + oCust1 + "')", {
		method: "DELETE",
success: function(data) {
MessageToast.show("Airline deleted Successfully with number  " + oCust1);
},
error: function(e) {
MessageToast.show("Airline deletion Failed  " + oCust1);
}
});
},
onUpdate: function() {
var oCust1 = that.getView().byId("input0").getValue();
var oCust2 = that.getView().byId("input1").getValue();
var oCust3 = that.getView().byId("input2").getValue();
var postData = {};
postData.Carrid = oCust1;
postData.Carrname = oCust2;
postData.Currcode = oCust3;
// that.getOwnerComponent().getModel().
that.getView().getModel().
update("/scarrSet('" + oCust1 + "')",
postData, null,
function(oData, response) {
MessageToast.show("Upadte successful for " + oCust1);
},
function(Error) {
MessageToast.show("Update unsuccessful for.." + oCust1);
});
}

});
});

