The SAP Fiori Launchpad behaves like an application container and it does not need the index.html file with the bootstrap to instantiate the application. Hence we add component file to our application and structure our application to make it suitable for SAP Fiori Launchpad.

Adding component.js file in SAP ui5 application is an important structural change for the better. With this we eliminate the dependency on index.html file and make our app flexible enough so that it can be launched from the SAP fiori Launchpad. Remember that SAP fiori Launchpad will launch your application via the component file and not the index.html file. The bootstrapping is now taken care by the Fiori Launchpad itself. Whenever we access resources, we will now do it relative to the component file instead of the index.html file. The component file is reusable and encapsulates all UI assets and are independent from the index.html file.
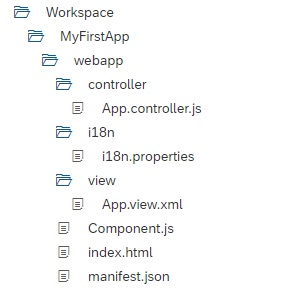
Inside webapp folder create the component.js file and manifest.json file. Delete the index.js file that we had created in earlier steps. Also, Create folder i18n inside webapp folder. Create i18n.properties file inside i18n folder. The folder structure will be something like below.

As you have removed the index.js file. This is the code that will now reside in the index.html file.
<!DOCTYPE html>
<html>
<head>
<meta charset="utf-8">
<title>MyFirstApp</title>
<script id="sap-ui-bootstrap"
	src="https://sapui5.hana.ondemand.com/resources/sap-ui-core.js"
	data-sap-ui-theme="sap_belize"
	data-sap-ui-libs="sap.m"
	data-sap-ui-resourceroots='{"Amarmn.MyFirstApp": "./"}'
	data-sap-ui-compatVersion="edge"
	data-sap-ui-oninit="module:sap/ui/core/ComponentSupport"
	data-sap-ui-async="true">
</script>
</head>
<body class="sapUiBody" id="content">
	<div data-sap-ui-component data-name="Amarmn.MyFirstApp"
           data-id="container" data-settings='{"id" : "MyFirstApp"}'>
     </div>
</body>
</html>
Note the change in data-sap-ui-oninit=”module:sap/ui/core/ComponentSupport”.
And the addition of <div> in the <body> tag.
Cool, so we have added three new files Component, Manifest and i18n. And deleted one file, index.js. Now we are close to a proper SAPUI5 application structure.
SAPUI5 Component.js file
You have already gone through the importance of component file. Lets understand the code that resides in a typical Component.js file.
The Component.js file has two important parts:
(i) The metadata section. It has property key manifest and value json.This prpotry calls the manifest.json file which is also know as the app descriptor file. It holds all app level configuration and helps keep our Component file clean thereby clearly separationg application coding from configuration settings.
(ii) Another section of component file is the init function that is called when the component is initialized. When the component is instantiated, the init function is automatically invoked.
sap.ui.define([
	"sap/ui/core/UIComponent",
	"sap/ui/model/json/JSONModel"
], function (UIComponent, JSONModel) {
	"use strict";

	return UIComponent.extend("Amarmn.MyFirstApp.Component", {

		metadata : {
			manifest: "json"
		},

		init : function () {
			// call the init function of the parent
			UIComponent.prototype.init.apply(this, arguments);

			// set data model
			var oData = {
				employee : {
					name : "John"
				}
			};
			var oModel = new JSONModel(oData);
			this.setModel(oModel);
		}
	});

});
SAPUI5 Manifest.json file
If you have not created yet, create Manifest.json file inside the webapp folder.
The component file calls the manifest file and we keep all app level configuration inside the manifest file. It is also important from the point of view that we will instantiate all models for our application inside the manifest file. The model instantiated in manifest file are directly set on the component and not on the root view. The good part is that because the controls are nested, it automatically inherits the models from their parent, hence the models will be available to view as well.
The manifest.json file is a configuration object in JSON format and you can do changes to it in Descriptor editor mode without touching the code. That makes the configuration really simple and quick.
The manifest.json file has three sections defined by namespaces: sap.app, sap.ui and sap.ui5.
(i) Sap.app holds the General settings like id, type, i18n, title, description, applicationVeriosn,
(ii) Sap.ui Specifies the Ui technology (in our case it is SAPUI5) and devices types(desktop, tablet, phone).
(iii) Sap.ui5 namespace holds most important parameters for the application.
rootView: the view specified here becomes the root view of the component.
dependencies: use this parameter to declare the UI libraries used in the application.
models: define the models in this section and get it automatically instantiated by SAPUI5. The i18n model and the json model are defiend under this section. The name of the model “i18n” is key and specify the bundle file by namespace.
{
"_version": "1.12.0",
"sap.app": {
	"id": "Amarmn.MyFirstApp",
	"type": "application",
	"i18n": "i18n/i18n.properties",
	"title": "{{appTitle}}",
	"description": "{{appDescription}}",
	"applicationVersion": {
		"version": "1.0.0"
	}
},
"sap.ui": {
	"technology": "UI5",
	"deviceTypes": {
		"desktop": true,
		"tablet": true,
		"phone": true
	}
},
"sap.ui5": {
	"rootView": {
		"viewName": "Amarmn.MyFirstApp.view.App",
		"type": "XML",
		"async": true,
		"id": "app"
	},
	"dependencies": {
		"minUI5Version": "1.60",
		"libs": {
			"sap.m": {}
		}
	},
	"models": {
		"i18n": {
		"type": "sap.ui.model.resource.ResourceModel",
		"settings": {
		"bundleName": "Amarmn.MyFirstApp.i18n.i18n"
		}
	}
},
"contentDensities": {
	"compact": false,
	"cozy": false
},
	"flexEnabled": true
}
}
Sapui5 Resource model
Sapui5 Resource model- SAPUI5 internationalisation example
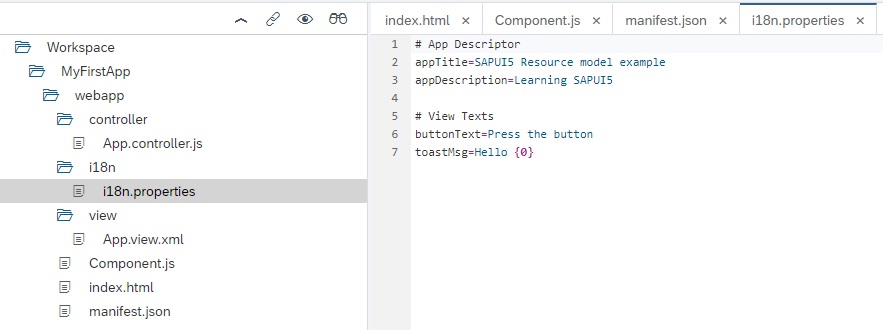
Resource model is a special model and is used for internationalisation purpose. It makes use of resource bundle. Resource bundle is simply a collection of files that holds translatable texts of various languages.
We create an i18n folder and place the resource bundle files under it. The entire text of our UI are moved into resource files. Remember that resource files end with suffix .properties. The resource files hold value in simple name value pairs separated by an equal sign.
In the onInit function of controller we instantiate the ResourceModel that points to the new message bundle file where our texts are now located (i18n.properties file).
In the onShowHello event handler function we access the i18n model to get the text from the message bundle file and replace the placeholder {0} with the recipient from our data model.

# App Descriptor
appTitle=SAPUI5 Resource model example
appDescription=Learning SAPUI5

# View Texts
buttonText=Press the button
toastMsg=Hello {0}
Perform the following changes in the App.Controller.js file.
sap.ui.define([
	"sap/ui/core/mvc/Controller",
	"sap/m/MessageToast"
], function (Controller, MessageToast) {
	"use strict";

	return Controller.extend("Amarmn.MyFirstApp.controller.App", {

onPress: function () {
	// read msg from i18n model
	var oBundle =
        this.getView().getModel("i18n").getResourceBundle();
	var sEmployee =
            this.getView().getModel().getProperty("/employee/name");
	var sMsg = oBundle.getText("toastMsg", [sEmployee]);

	// show message
	MessageToast.show(sMsg);
	}
});

});
Perform the following changes in the App.Viewxml file
<mvc:View controllerName="Amarmn.MyFirstApp.controller.App"
    xmlns="sap.m" xmlns:mvc="sap.ui.core.mvc">
<Button
      id="button" text="{i18n>buttonText}"
      press=".onPress"/>
<Input
      id="input1"
      value="{/employee/name}"
      valueLiveUpdate="true" width="60%"/>
<Text id="text" text="Hello {/employee/name}"></Text>
</mvc:View>
The output of the application is the same but we have made a major change at structure level.

SAPUI5 Tutorials
- SAPUI5 Development Environment Setup
- MVC architecture in SAPUI5 application
- SAPUI5 Programming for Beginners- Part 1- Start coding in SAPUI5
- SAPUI5 Programming for Beginners – Part 2 – Introducing SAPUI5 JSON Model
- SAPUI5 Component.js file and SAPUI5 Manifest file – Part 3 – SAPUI5 Programming for Beginners
- Embedding custom CSS style class to SAPUI5 control – Part 4- SAPUI5 Programming for Beginners
- SAPUI5 ComboBox XML Example: Bind Items, Get Selected Item
- SAPUI5 Fragments Example – Part 5 – sapui5 tutorial for beginners
- SAPUI5 sap.m.list example Aggregation Binding – Part 6 – sapui5 tutorial for beginners
- SAPUI5 Expression Binding How to Use – Part 7 – sapui5 tutorial for beginners
- SAPUI5 Custom Formatter Functions How to Use – Part 8 – sapui5 tutorial for beginners
- SAPUI5 Routing and Navigation with Parameter – Part 9 – sapui5 tutorial for beginners
- SAPUI5 OData model: How to consume Northwind OData service in SAPUI5 Application
- SAPUI5 table with edit Button and editing row value in popup Dialog box
- Connecting SAP HANA Cloud Platform with the Cloud Connector
- SAPUI5 SplitApp example in the easiest way
- SAPUI5 OData: How to implement Filter, Sort, Expand and Group
- SAPUI5 OData CRUD Operations
- SAP tools for Eclipse
- Raise Odata error message handle in SAPUI5
- SAPUI5
- SAPUI5 Nested View
- SAPUI5 define modules
- SAPUI5 Element Binding master detail table example
- SAPUI5 display Message Toast

