HTTPS has become the norm. You have landed to this page because you understand the importance of website with HTTPS enabled. This not only secures the site, but also gives boost in search ranking.
How to enable HTTPS for self-hosted WordPress site
In order to make your site enabled with HTTPS you will need a SSL certificate. Once the SSL certificate is successfully installed, your site will start appearing with HTTPS protocol.
You must be wondering what does SSL certificate do?
In a website with SSL Certificate installed, it enables a security protocol that provides a secure connection between the web browser and the web server. Hence the website starts appearing with HTTPS instead of HTTP. In other words you can say that a secure, encrypted connection is established between the browser and server and provides your visitor with a secure web browsing environment.
Do we need to buy SSL certificate?
Yes, you may have to buy SSL certificate. All major hosting providers encourage you to buy SSL certificate. You just have to ensure that you are buying the SSL certificate from a legitimate source.
Can we get SSL certificate for free?
Yes it is possible to get SSL certificate for free and thereby making your website appear on HTTPS protocol. But before you go for a free SSL, you must first evaluate about the benefits of a paid SSL certificate.
One thumb rule is, if your website is all about displaying information and you don’t collect users data, then a free SSL should suffice.
Enable HTTPS for WordPress website hosted on GoDaddy for free
A website from where you can get genuine, legitimate SSL certificate for free is zerossl.com . Go to zerossl.com .
On zerossl website click online tools button.

For Free SSL Certificate wizard, click Start button.

In wizard, enter domain name. Make sure to enter both combinations of domain i.e. domain.com and www.domain.com .

On the next screen download the certificate generated. Click Next.

In the next screen, donwnload the Private Key generated and click Next.

In the next screen, you will get two files. Download these two files. These two files needs to be placed in the domain folder structure.

In the above step, we got two files. These two files needs to be placed in folder structure of domain. For this login to your domain’s cpanel and click on File Manager.

You need to search for folder public_html. Under this folder create folder .well-known. Under folder .well-known create another folder acme-challenge. If you already have this folder structure, then you can directly go to acme-challenge folder.

Upload the two files downloaded in Step 8 and 9 into acme-challenge folder.

The above step is kind of verification step that you are the owner of this domain. Once the file upload process is complete go back to zerossl wizard and click Next.

You finally reach page where it says Your certificate is ready! This is your free SSL certificate for your site. The first file is the SSL certificate file and the second file is the Private Key file. Download both files and open both files with notepad.

Now that we have the SSL certificate and the Private Key, we must install these in the hosting of domain. Go to cpanel of your domain and look for SSL/TLS under security section. Click on SSL/TLS.

Inside SSL/TLS click on Manage SSL sites.

After clicking on Manage SSL sites, you will see a screen like below. Select the domain in drop-down. Now you must the SSL certificate open in notepad. If you look inside it, you find that there are two certificates. It can easily be traced by words —–BEGIN CERTIFICATE—– and —–END CERTIFICATE—– . Copy the first certificate and paste it in first box. Copy the another certificate and paste in last box. The middle box is for Private Key. Copy the Private Key that you must have opened in notepad, and paste in middle Private key box. Follow the image below for reference.
Finally click on Install certificate button.

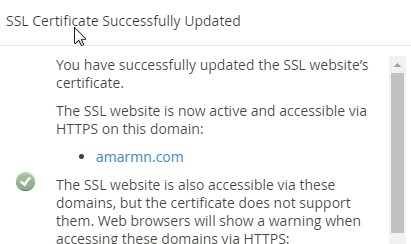
Once installed, you will find the message SSL Certificate Successfully updated. Congrats. You have successfully installed free SSL Certificate.
Note that the SSL is valid for 90 days. After 90 days, you will again have to follow the above steps.

Redirect website traffic from http to https for WordPress site
Its important to do the configuration to redirect all traffic from http to https.
Go back to hosting File Manager. Under public_html locate the .htaccess file. There might be a chance that you may not be able to locate it. If that is the case ensure that in Settings, Show Hidden Files is checked.
Open the .htaccess file to edit it.
Skip if it contains any code and at last copy and paste the below lines of code.
RewriteEngine On
RewriteCond %{HTTPS} off
RewriteRule ^(.*)$ https://%{HTTP_HOST}%{REQUEST_URI} [L,R=301]
Save the changes and close the file. Now your site should redirect from http to https automatically.
