Create First Fiori Elements Application
We will use SAP provided GWSAMPLE_BASIC to create our first SAP Fiori Elements Application. This will make us familiar with the overall process of SAP Fiori Elements development.
- Open SAP BAS. Run and enter the required Dev Space
- From menu choose File -> New Project from Template.
- Select SAP Fiori Application and click Start.
- In the Application Type dropdown, select SAP Fiori Elements. Choose floorplan List Report Object Page and click Next.
- In Data Source and Service Selection, for Data Source choose Connect to a System. For System, select destination system. In Service, search GWSAMPLE_BASIC and choose the same. Click Next.
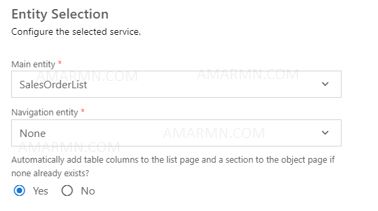
- In the Entity Selection screen, select SalesOrder at Main entity. Choose Next.

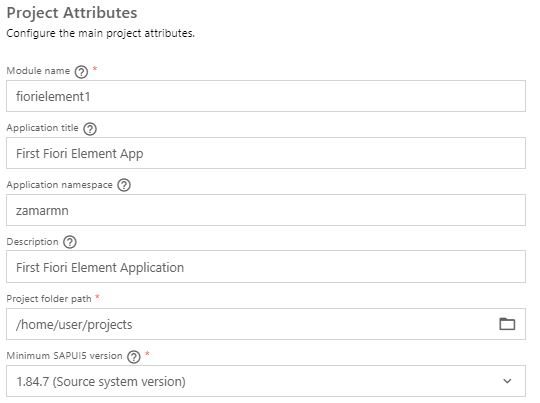
7. Fill the project attributes. Click Finish.

The project gets created within PROJECTS workspace.
Add Annotations
Next, we will add annotations to the SalesOrder entity.
- Choose View -> Find Command. Enter guided and choose Fiori: Open Guided Development.
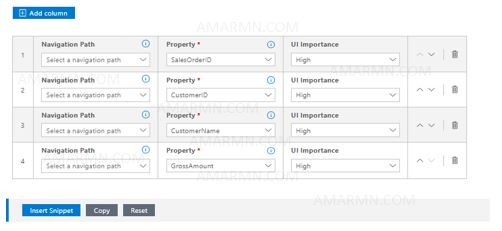
- Choose Add and edit table columns. Note that it uses UI.LineItem annotation. Click Start Guide.
- At Entity Type, select SalesOrder.
- For Property select SalesOrderID.
- Click Add Column, to create a new column. Select CustomerId for Property. Similarly, add Customer Name and GrossAmount.

6. Click Insert Snippet.
The code is added to the annotation.xml
<edmx:Edmx xmlns:edmx="http://docs.oasis-open.org/odata/ns/edmx" Version="4.0">
    <edmx:Reference Uri="https://sap.github.io/odata-vocabularies/vocabularies/UI.xml">
        <edmx:Include Namespace="com.sap.vocabularies.UI.v1" Alias="UI"/>
    </edmx:Reference>
    <edmx:Reference Uri="/sap/opu/odata/iwbep/GWSAMPLE_BASIC/$metadata">
        <edmx:Include Namespace="GWSAMPLE_BASIC"/>
    </edmx:Reference>
    <edmx:DataServices>
        <Schema xmlns="http://docs.oasis-open.org/odata/ns/edm" Namespace="zamarmn">
            <Annotations Target="GWSAMPLE_BASIC.SalesOrder">
                <Annotation Term="UI.LineItem">
                    <Collection>
                        <Record Type="UI.DataField">
                            <PropertyValue Property="Value" Path="SalesOrderID"/>
                            <Annotation Term="UI.Importance" EnumMember="UI.ImportanceType/High"/>
                        </Record>
                        <Record Type="UI.DataField">
                            <PropertyValue Property="Value" Path="CustomerID"/>
                            <Annotation Term="UI.Importance" EnumMember="UI.ImportanceType/High"/>
                        </Record>
                        <Record Type="UI.DataField">
                            <PropertyValue Property="Value" Path="CustomerName"/>
                            <Annotation Term="UI.Importance" EnumMember="UI.ImportanceType/High"/>
                        </Record>
                        <Record Type="UI.DataField">
                            <PropertyValue Property="Value" Path="GrossAmount"/>
                            <Annotation Term="UI.Importance" EnumMember="UI.ImportanceType/High"/>
                        </Record>
                    </Collection>
                </Annotation>
            </Annotations>
        </Schema>
    </edmx:DataServices>
</edmx:Edmx>
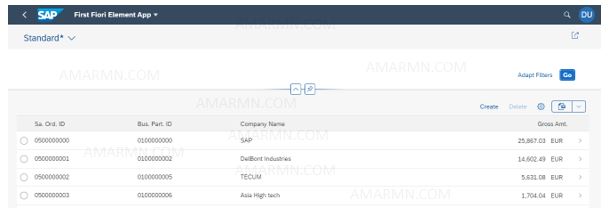
Run the application. Below is the output.

Adding annotation UI.HeaderInfo
...
            <Annotations Target="GWSAMPLE_BASIC.SalesOrder">
                <Annotation Term="UI.HeaderInfo" >
                    <Record Type="UI.HeaderInfoType">
                        <PropertyValue Property="TypeName" String="SALES ORDER"/>
                        <PropertyValue Property="TypeNamePlural" String="SALES ORDERS"/>
                        <PropertyValue Property="Title">
                            <Record Type="UI.DataField">
                                <PropertyValue Property="Value" Path="SalesOrderID"/>
                            </Record>
                        </PropertyValue>
                    </Record>
                </Annotation>
                <Annotation Term="UI.LineItem">
...
Deploy to SAP system
- Right-click the project folder and select Open in Terminal
- Enter npm install and press Enter
- Enter npm run build and press Enter
- Enter abap-deploy and press Enter
- Press Enter at Specify the source folder path for deployment to use ./dist
- For Select a target ABAP System press Enter for the required destination
- Enter application name – zamarmn_fe1
- Next, enter a description for the application
- Enter a package for the deployed application – ZAMIT_TRAINING
- Enter a transport request for the deployed application –
